

Food is the heart and soul of every great family story. From hearty soups that remind us of our grandma’s cooking to savoury treats that connect us to a past experience, home cooked meals often arouse deep, powerful emotions.
To celebrate Asian Heritage Month, we’re sharing our audiences’ favourite family recipes to inspire your taste palate.
Cơm nắm muối vừng (Vietnamese sesame salt rice balls)
Submitted by: Hollie Ha

My parents were born and raised in Vietnam. They were just young teenagers when their families, like many others, were forced to leave their homes. They eventually settled in Canada as refugees in the 1970s. We’re fully Chinese by blood but culturally half Vietnamese, especially when it comes to the food we eat.
This recipe is not glamorous or flashy, but the memories and sentiments attached to it are beyond measure. Rice balls are often thought of as “poor man’s food” — but for my mom and her siblings growing up, it was one of their favourite snacks. My mom ran home from school in Vietnam to her grandmother’s signature rice balls.
To this day, something about the chewy texture and salty flavour brings a flood of nostalgia and memories to my parents. Every time they recall or make this dish, it’s a joyful reminder of our family roots, what they’ve been through, how far they’ve come, and how much we have to be eternally grateful for.
A dish as plain as rice and salt packs a big punch when it comes to culture. Keeping simple recipes like this alive among our generation is more than just about food — they’re symbols of our heritage, identity and family stories.
Ingredients:
(yields 3 rice balls)
- 2 cups uncooked white rice
- ⅛ cup of roasted sesame seeds
- ½ teaspoon of salt
- 2 tablespoons of crushed peanuts
- ½ teaspoon of sugar (optional)
- Soy sauce (optional)
Directions:
1. Wash and cook the rice as normal. Ensure there is enough water so the rice isn’t dry when it’s finished cooking.
2. While the rice is cooking, add sesame seeds to a small pan. Toast until fragrant and golden, about 1-2 minutes.
3. Combine sesame seeds, salt, and crushed peanuts in a small bowl and mix (optional: add sugar if you’d like to balance out some of the saltiness). Coarseness of the mixture is up for personal preference! For a finer, more uniform consistency, pulse in a food processor or grind by hand until desired texture is reached. Set aside.
4. Prepare a working space with two clean and damp kitchen towels and a plate. As soon as the rice is finished cooking, immediately scoop out ⅓ of the cooked rice into the middle of one of the towels.
5. Gather the rice within the towel and start forming into a ball. Be careful as the rice will be very hot. With one hand securing the towel closed, use the other to squish and knead the rice inside the towel with the palm of your hand. Frequently check the rice ; once it has formed a sticky consistency, twist the towel while squeezing and shaping the rice into a very tight ball. The size of the rice ball should shrink to about half the size of the fresh rice that you started with.
Once you’re satisfied with the shape, peel the rice out of the towel, place on the plate, and cover with the second towel to keep from drying out. Re-dampen your working towel, and repeat this process two more times with the rest of the rice.
6. After your rice balls have been formed, cover with the damp towel, and let it cool completely.
7. When cooled and ready to enjoy, wet a knife and slice into sticks. Wet your knife before each new slice to prevent sticking.
Arroz caldo (Filipino Congee)
Submitted by: Maria Ellorin

Chances were on grey, wintry days when we’d bundle up in layers because my parents refused to turn on the heat, you’d find a big pot of arroz caldo (Filipino congee) simmering on the stove.
Arroz caldo was an understated dish while I was growing up — I never begged for it like I did lumpia (Filipino spring rolls) for my birthday. But it was consistent and always hit the spot, never failing to warm my bones. Which, when I think on it now, is an embodiment of my mother: reliable and unassuming.
Ingredients
- 1 cup of roasted chicken, shredded
- 2 cups of cooked white rice
- 2 boxes of Campbell’s chicken broth
- 2 tablespoons of Patis (Filipino fish sauce)
- 1 teaspoon garlic, minced
- 1/2 tablespoon ground black pepper
- 1 cup onion, minced
- 4 eggs, hard boiled
- 1 cup green onions, minced
- 2 knobs ginger, julienned
- 3 tbsp safflower kasubha (optional; for colour only)
- 1 lemon, sliced as a garnish (or 4 pieces of calamansi (Filipino lime) if you can get it)
- 2 tbsp cooking oil
Instructions:
1. Sauté garlic until it’s golden brown. Then add onions and ginger. Cook for about two minutes.
2. Add shredded chicken and cook for about 2-3 mins.
3. Pour the chicken broth into the cooking pot. Use one box and a half only. Reserve the rest for later, if needed.
4. Add the cooked rice.
5. Season with ground pepper and patis to taste.
6. Simmer until the rice is soft and mushy, stirring constantly (add remaining broth, as needed).
7. Serve with boiled eggs on the side and top with fried garlic (optional, but it adds an extra delicious flavour).
Ema datshi (Chilli and Cheese)
Submitted by: Ugen Lhazin
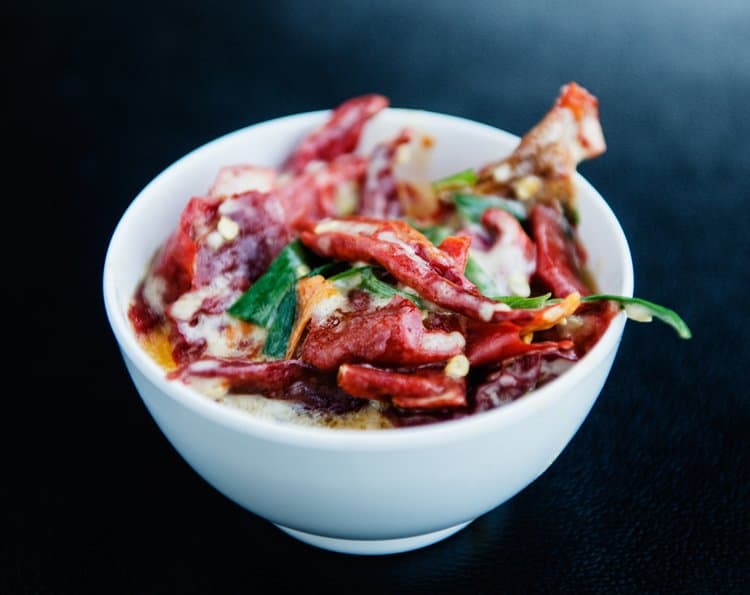
Nothing makes me feel closer to home than a nice plate of spicy ema datshi with rice accompanied by suja (butter tea). Ema datshi is a staple in every Bhutanese home; we love spicy foods. It’s almost always served at every meal—sometimes even at breakfast.
I’ve been away from home since I was 16 and every time I come back to Bhutan, ema datshi is the first meal I’ll have. Sometimes, my parents will pack ema datshi as a lunch for me and we’ll have a small picnic on the way home from the airport.
This is also the last meal that I eat before I leave my country—usually for breakfast before I catch an early flight. Don’t be fooled though, ema datshi is not for the faint of heart. It’s an extremely spicy dish, so make sure you have suja handy!
Ingredients
- 9-10 green or red Chillies (or combined), sliced lengthwise
- 1/2 tomato, sliced
- 2-3 green onion stems, chopped
- 1 onion, sliced
- 5-6 garlic cloves crushed/sliced
- 1-2 tbsp oil
- ½ cup, grated cheese (I use Amul cheese, but cheddar and/or feta works well too)
- Salt to taste
- 1 cup water
Instructions:
- Cut the chillies in half, then slice it lengthwise.
- Add oil to a frying pan and cook the chillies until it’s completely tender.
- Combine all the ingredients (minus the cheese) and add it to the pan. Cover with a lid and cook for 3-4 mins on high heat.
- Turn off the heat and add the cheese, allowing it to melt.
- Stir the mixture thoroughly. Top it with fresh green onions before serving. Enjoy!
Notes:
- Back home, my brothers eat this dish dry so my preference is the same. However, if you prefer a soupier taste, add more water. Stick to one cup if you prefer to eat it dry (if you add too much water, simmer the dish longer to evaporate it).
- My favourite vegetable to add is potatoes. Mushrooms are another delicious alternative!
- Bhutanese people traditionally eat this with rice, but you can pair it with bread, naan or roti.
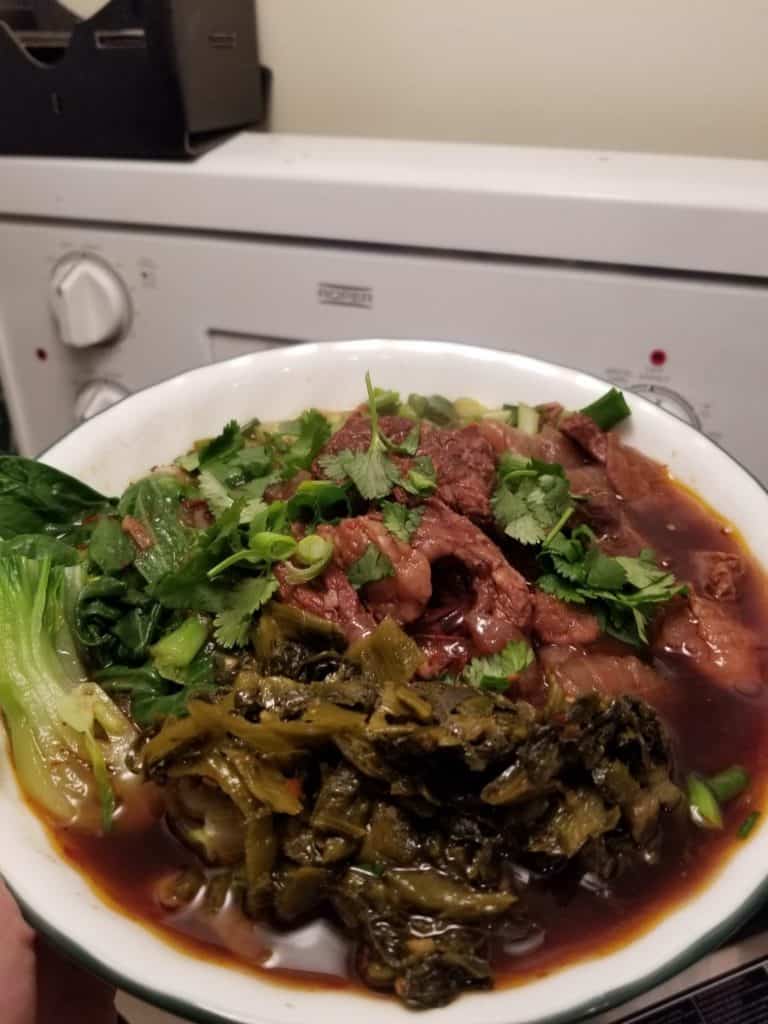
Taiwanese Beef Noodle Soup
Submitted by: Tasha Cheng
Anytime I felt under the weather, my grandma would make her version of a Taiwanese Beef Noodle Soup. I grew up in a single parent household, which meant that I spent a large chunk of my childhood with my grandparents. Without them, I wouldn’t have grown up speaking Cantonese regularly and I wouldn’t be half the woman I am today.
Hearty and nourishing, this soup pairs melt-in-your-mouth tender chunks of beef shank and tendon with sweet carrots and aromatics. My grandmother’s take includes daikon radish and carrots as well—a Cantonese spin on a Taiwanese classic. She’s no longer with us, but I think of her often and recreate her recipes as a way to pay tribute to her memory.
Ingredients:
- 2 pounds beef shank roughly cut into large chunks
- 1/2 pound beef tendon (or more depending on personal preference)
- 2 tablespoons oil
- 2-inch knob of smashed ginger
- 6 cloves garlic, smashed
- 3 scallions, cut into 2-inch segments
- 1 onion, cut into wedges
- 2 tomatoes, cut into wedges
- 1 large carrot, peeled and cut into large chunks using a roll cut
- 1 daikon radish, peeled and cut into large chunks using a roll cut
- 2 tbsp tomato paste
- 2 tablespoons, doubanjiang (chilli bean paste)
- A small piece of rock sugar (to taste)
- 1/2 cup light soy sauce
- 1/2 cup Shaoxing wine
- 4 star anise
- 1 small cinnamon stick
- 2 bay leaves
- 2 tablespoons Sichuan peppercorns
- 1 teaspoon five spice powder
- 1 teaspoon black pepper
- Noodles of choice (my personal preference are the fresh Shanghai ones you can get at your local Asian grocer)
- Bok choy for serving
- Cilantro and scallions, finely chopped for garnish
- Pickled mustard greens to taste (I like the individually portioned packs for convenience)
- Chili oil of choice to taste (Lao Gan Ma is my favourite!)
Instructions:
1. PARBOIL: Boil enough water in a large stockpot to cover all of the beef shank and tendon pieces. Once the water comes to a boil, add the beef shank. Let it return to a boil and simmer for a few minutes before straining in a colander under running water. Don’t skip this step – it helps remove any impurities in the meat and creates a much cleaner broth without scum. Clean out your stockpot before proceeding to step two.
2. Add the oil, crushed ginger, garlic, scallions, and onions in that order. Let the aromatics slowly caramelize and the onions turn translucent before adding in the tomato paste. By letting the tomato paste ‘brown’ in the pan, you’re adding a lot of depth to the flavour of the broth. Once it concentrates into more of a dark maroon colour, add in the tomatoes, carrots, and daikon.
3. Return the meat to the pot, along with the spicy bean paste, rock sugar, soy sauce, and Shaoxing wine. Mix thoroughly before adding 8 cups of water and all the spices. Let the soup simmer on low for at least three hours, adding the tendon in for the last hour of cooking. Remove bay leaves and the cinnamon stick from the broth.
4. Cook your noodles according to the package instructions – in the last two minutes, throw your bok choy in as well and blanch until tender.
5. Add your desired portion of noodles to the bowl before garnishing with a few stalks of bok choy. Top with cilantro, scallions, and Chinese pickled mustard greens, and serve with chilli oil on the side. Enjoy!
Chả Giò (Vietnamese egg rolls)
Submitted by: Vivian Dang

If you look through birthday photos of me from the age of four onwards, you’ll see chả giò (Vietnamese egg rolls) half-eaten in my hand. For as long as I could remember, chả giò was a staple for any celebratory occasion.
I’d wake up on rare mornings and see a stack of neatly wrapped rolls laid out in pyramid formation — a sign that it was either Tết (Vietnamese Lunar New Year) or someone’s birthday. The delicious aroma of deep fried meat wafting through the air always conjures joy and excitement. It’s like taking a bite of happiness everytime I stuff myself with chả giò on these celebratory occasions.
My mother crafts her own recipe from scratch and every few years, she refines it — adding and removing ingredients based on our family’s taste buds. Chances are, if you’re a friend of family, you’ve had a taste of Mama Dang’s famous chả giò. Check out her masterpiece below:
Ingredients
(yields 50 springs rolls)
- 2 packages of egg roll wrapping paper
- 1 lb ground pork
- ½ pound, shrimp or crabmeat
- 2 oz, vermicelli noodles
- 2.5 oz, wood ear mushroom
- 1 medium taro root, shredded
- 2 carrots, shredded
1 onion, minced - 1 tablespoon, ground pepper
1 tablespoon, sugar - 1 tablespoon, salt
- 2 tablespoons, oyster sauce (any brand is good)
- 1 egg
- Vegetable or canola oil for cooking
Directions:
Preparing the meat and shrimp filling
1. Soak the wood ear mushrooms in hot water for 30 minutes. Cut off the knobby centre and discard them. Start slicing the mushrooms lengthwise (roughly 2 cm long) and ensure they’re cut very thin. You’re aiming for “noodle-thin”. Set aside.
2. Using a mandolin slicer (or any fruit/vegetable slicer), slice the carrots thin and long like matchsticks (about 3 cm). Make sure the carrots aren’t cut too thick because when you deep fry the spring rolls, they won’t cook as thoroughly.
3. Using the same mandolin, slice the taro roots like the carrots in step #2.
4. Boil vermicelli noodles according to the package. Once it’s soft, drain the noodles and use scissors to cut them into small pieces (roughly 5 cm).
5. Combine all ingredients into a large bowl. Use your hands to mix the ingredients together. Cover the mixture and refrigerate for roughly 1-2 hours to allow the flavours to fully marinate. (Note: if you have time, refrigerate the mixture for one full day for maximum results).
Wrapping the egg rolls
1. Separate one egg yolk into a small bowl and set aside. This will be used as a glue to seal the egg rolls.
2. Place one wrapper on a cutting board so that it looks like a diamond. Place one spoonful of the meat and shrimp filling and place it on the corner closest to you. Use your fingers to slightly spread it out lengthwise. Don’t put too much filling on the wrapper — it’ll rip when you roll it.
3. Fold this corner up. Then fold over the side corners. It should look like an envelope.
4. Start rolling up. As you’re rolling, make sure that the filling side is wrapped tightly. Dip your finger into the egg yolk to seal the roll.
5. Continue rolling until you end up with 50 rolls.
Frying the egg rolls
1. Add enough oil to cover the egg rolls in a nonstick skillet on medium heat.
2. Once the oil becomes hot, start cooking the egg rolls. Turning as needed until it’s golden brown.
3. Set aside allowing it to cool for a few minutes before serving.
*Bonus recipe: Nước mắm (Vietnamese fish sauce)
It’s essential to eat chả giò with nước mắm (Vietnamese fish sauce)! The sweet and savoury taste adds an extra punch of flavour to chả giò.
Ingredients
- 1 cup of fish sauce (any brand)
- 1/2 cup of sugar
- 2 cups of water
- 1/3 cup vinegar
- 2-3 tbsp minced garlic
- 2-3 red chilli peppers
- *optional: 1 lime (read directions first before adding)
1. Mix all the wet ingredients together. Add more sugar/vinegar according to taste. Add more sugar, if you want it to taste sweeter. If it’s too sweet, add more vinegar to dilute it.
2. After you’ve decided on the base, add in the garlic and chilli peppers. It’s important not to mix all the ingredients all at once. If you want to adjust the taste, it’s hard to do once you’ve added in the garlic and chilli peppers.
3. Optional: If you’re serving the sauce fresh, squeeze in a bit of lime. Adjust to taste. However, if you want to store the sauce for a few weeks, don’t add the lime as it ruins the flavour.
With so many delicious meals at your fingertips, we hope you feel inspired to try out these recipes. Get in the mood, blast some music, and cook up a storm. Share your recipes and tag us – we’d love to see what you create!
Help us uplift Asian diaspora voices
Support Cold Tea Collective with a monthly contribution to help ensure stories for and by the next generation of the Asian diaspora are here to stay.


